Truck caps, typically recognized as camper shells, supply a truck with a feeling of elegance and beauty although also delivering helpful and welcome functionality. An exceptional short-term shelter when camping or traveling is a truck cap, which you may possibly use to transport objects with no acquiring them wet or dirty. While numerous of these caps currently have lights installed, some do not, so you will want to discover how to wire them oneself. Even although the assignment may possibly appear tough, every person can comprehensive it.
Wiring a third brake light truck cap
Step 1
To stop injury to you or your truck in the occasion of a quick, disconnect the batteries from your car. To stop acquiring dirt or debris in your eyes although you crawl beneath the truck, place on the security goggles 1st.
Step two
On the driver’s side of your vehicle, you ought to be in a position to locate the wiring harness. Follow it up to your car’s tail light section.
Step three
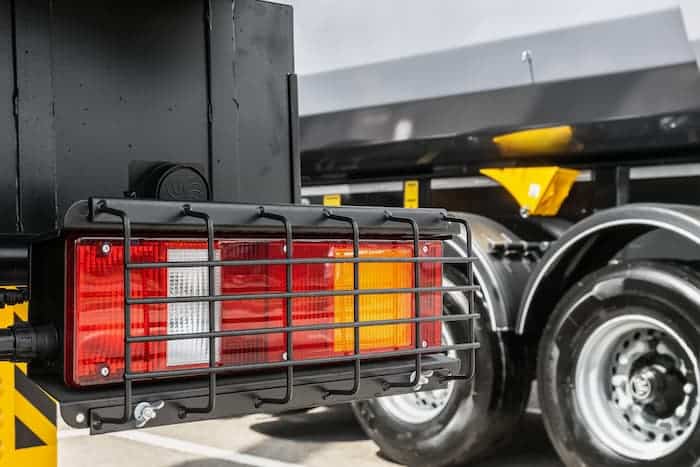
Find the green wire on the vehicle’s bottom. You can recognize this wire considering that it will not be linked to something else, even if the colour of the wire may possibly differ among automobiles. This line is normally installed by makers in case you want to connect a trailer to the electrical grid.
Step four
Make cautious to leave a half-inch of bare wire exposed when you strip the wire’s finish off.
Step five
Create a point of connection to join the two cables collectively.
Step six
Connect the truck cap to the male connector. To permanently fuse the connection in location, use the shrink tubing.
Step 7
Connect the female connector to the green wire employing wire, and then use shrink tubing to wrap the wires safely.
Step eight
Using zip ties will hold the male wiring in location and maintain it from falling when not in use. If far more zip ties are necessary, maintain all wires in location.
Step 9
Your car’s battery should be reconnected. Be alert for any off-placing smells or popping sounds. To verify if the light is on, have a pal stand behind the vehicle although you apply the brake pedal.
Wiring a truck cap for an internal reading/light dome light
Step 1
To stop injury to you or your truck in the occasion of a quick, disconnect the batteries from your truck.
Step two
Pull each dome light’s wires back a tiny bit and reduced them from the cab’s ceiling.
Step three
Push the wire rapidly connects ends by means of the headliner panel’s edge.
Step four
Connect the wires in the truck’s dome light employing solder.
Step five
Put the headliner in location of the dome light.
Step six
Using the robust-duty mounting glue supplied in the package, attach the reading/dome lights to the acceptable spots inside the truck cap, connecting the wires as you go.
Step 7
Feed the wires by means of the wire cover tube that was incorporated in the kit, and then use the heavy-duty snips to gently reduce down the tube, taking care not to reduce the wires.
Step eight
Using the robust adhesive supplied in the kit, attach the wire cover tube to the truck cap.
Step 9
Each wire ought to be reduce and stripped slightly, then inserted into the quick connection that was incorporated in the kit. A drop of solder ought to be utilized to safe every single wire.
Step ten
Open the tiny glass in the truck’s back window and the truck cap’s pass-by means of window. Attach the joiner cable from the kit to the quick connect you place in the truck cab and the fast connect on the truck cap.
Installing a truck cap
Truck caps are helpful due to the fact they assist to safely transport worthwhile things or make camping simpler, in addition to enhancing the look of your pickup truck. Truck caps are created to match correctly on only a couple of sorts and models of trucks. Make certain you get the acceptable cap for your truck. High-good quality truck caps will have their personal aluminum clamps and will not want to be secured to the bed rails by drilling. Some interior lamps in newer truck caps may possibly need drilling a tiny sufficient hole to connect wiring to the rear taillight assembly. These lamps have a higher mount brake light.
Step 1
A soft location, such as grass or an unpaved surface ought to be covered with a sizable blanket. Have a helper help you in turning the truck cap more than so that its prime is on the blanket.
Step two
Except for the rear hatch, wrap an adhesive foam weatherstripping about the bottom of the truck cap. Ensure that the sticky side is on the bottom of the cap.
Step three
Your pickup truck’s tailgate ought to be opened.
Step four
Have a helper help you in flipping the cap back more than and very carefully putting it onto the truck’s bed. Both edges of the cap ought to rest level on the mattress.
Step five
With the assist of two of the aluminum hardware clamps, get into the pickup’s back. Place the clamps as close to the front of the truck bed as you can, then tighten them.
Step six
To make sure that the cap’s rear window can totally close, close the tailgate. Adjust the alignment of the cap as required. The rear hatch will appropriately close and lock when you have attained the proper position.
Step 7
With the final two aluminum hardware clamps, crawl back into the truck’s back. Using a socket and ratchet, location the clamps on the bed rails as close to the back of the truck as feasible and tighten all 4 clamps.
Step eight
If required, make a tiny hole close to the left rear taillight assembly. Make the hole huge sufficient to accommodate the cap’s wiring.
Step 9
Remove the rear taillight assembly from the truck and insert the cap wire into the hole to reveal the wiring. To reduce, strip, and butt connect the higher mount brake light, find the brake wire. Remove a tiny bit of the brake wire’s insulation. Connect the truck’s brake wire to the higher-mount stoplight wire. Put the taillight assembly in location and clean the taillight employing a restoration wipe solution.