A dirty headlight case can drastically diminish your visibility at evening. Additionally, moisture trapped inside your headlight element can also trigger other troubles such as bad or dimmed headlight bulbs. So, if you are questioning how to get these moistures out of your headlights, right here are a handful of pointers to get your comprehensive headlight variety of vision back.
How moisture impacts your automobile headlights
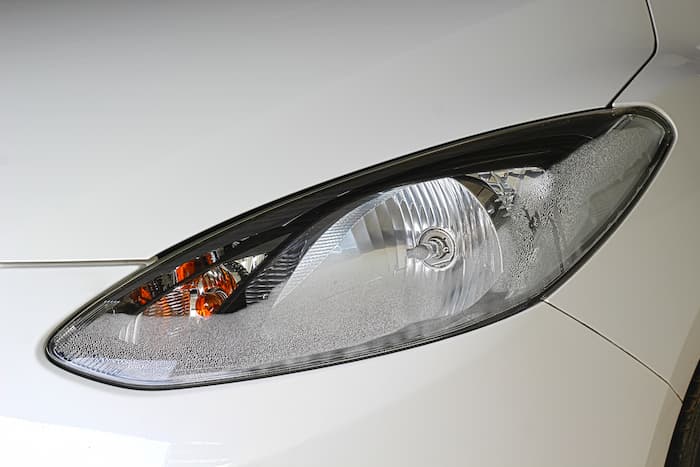
Moisture that has been trapped may possibly be problematic, particularly whilst driving at evening. Moisture trapped inside the seal, such as debris and fog on the outdoors of your headlight case, can dim your lights or even generate blind spots.
In some regions, headlight fog will stop you from passing your automobile inspection. This could outcome from a leak in the seal about your headlight, permitting water to enter the space behind the lens. It could also be triggered by wet air, which heats up whilst your headlight bulb is on and cools down when it is switched off. Condensation types on the inner of the lens as a outcome of this.
How to repair condensation in headlights
You can use a handful of easy tricks if you see a tiny location of moisture forming in your headlight with no breaking the seal. It’s quite simple to break the seal among your headlight lens and housing, but after it is broken, you will require to be really cautious when replacing it. If you are not certain how to function with sealants, it is a great thought to take your automobile to a mechanic.
Check your headlight housing vent prior to removing the seal. Although the distinct place of the venting will differ based on your car’s make and model, most headlight systems include a vent to stop condensation accumulation. A blocked vent is a recognized trigger of mild condensation. Debris, spider webs, or dust could be the blame. Wipe the vent with a soft cloth or blow it out with compressed air. If you blow or push anything into the headlight housing, you will have to break the seal to get it out.
How to repair main condensation in headlights
Condensation on a huge scale includes much more complicated strategies. Depending on your cash, offered time, and the quantity of condensation, you can try a variety of possibilities. The headlight unit need to be removed for main condensation removal. For guidelines on removing the bulb, electronics, plugs, and any other elements that can be removed, seek advice from a service manual. Remove the headlight housing with care, following the removal approach.
Using a hairdryer to dry out the damp air with no breaking the seal. Blow hot, dry air into the vent or on the outdoors of the headlight assembly with a hairdryer. It need to dry out as it heats up. To see if this approach worked, wait till your headlight unit cooled down.
Finally, you will require to get rid of the seal if you want to get water out of the headlights fully. Before you commence, seek advice from a service manual to discover how to get rid of your seal. Unless your assembly has a replaceable seal, this approach will be far much more complicated and will demand the use of a heat gun. If you have not employed a heat gun prior to in a circumstance like this, your headlight assembly is not the very best location to begin. This guide is primarily based on the reality that you have a replaceable seal. Hand tools such as sockets and screwdrivers, silica gel packs, a lint-cost-free cloth, and a sealant are essential for this removal approach. It requires longer than other options, but it need to fully get rid of any moisture deposit.
Remove the seal and the clear plastic headlamp cover from the housing with care. Ensure that you haven’t overlooked any screws or other attachment points. With your cloth, wipe away any remaining moisture. Before employing the cloth, make certain it is clean and dry. Majority of the moisture can be removed by wiping the interior with a cloth, despite the fact that this is not a comprehensive answer.
Use silica gel packs to absorb any remaining moisture. These are made to soak up any moisture in the air and place in the headlight assembly. If you do not want a pack bouncing about in front of your headlights, make sure they’re not obstructing the light or becoming exposed to the bulbs.
Check for any residual moisture or debris in your headlight assembly after once more. To effectively reseal your assembly and stay away from much more moisture, comply with the guidelines beneath. This is the most crucial step considering that the incorrect reinstallation can let added moisture into your headlight.
How to stop additional mositure in headlights
Following a typical car headlights restoration routine is to stop headlight moisture in the future. While there are a range of supplies offered to support you clean your automobile headlights, you may possibly want to opt-in for the item that is produced especially for headlights and that does not demand you to be a skilled at headlight sanding. This is why we suggest you buy clear light tech – a restoration kit that comes with easy cleaning options, wipes, and coating supplies.
Aside from restoring your headlight frequently, appear for any harm or debris on your headlight assembly. If required, apply a bead of silicone sealant about the factory seal to stop moisture from getting into the assembly, or replace the seal if your housing has 1. You need to also verify the O-rings that shield your headlamp assembly’s electrical connectors, bulb, vent, and other elements.
Consider investing in a handful of higher-high quality products to support you create a watertight seal. Silicone spray can be employed to shield your O-rings and silicone sealant gel can be employed to repair any cracks or broken portions of the lens-to-housing seal. Lastly, verify your headlight frequently for any indicators that it hasn’t been effectively sealed.
How to get water out of headlights
It’s simple to know how water got inside your headlight if the cover is cracked or the seal about it is broken. However, if there are no cracks or harm to the headlight, the moisture is most likely condensed. The humid climate is a massive trigger when it comes to water-logged headlights. When you turn on your headlamp at evening, the humid air inside the headlight housing warms up. Once you have parked and turned off the lights, the air will cool, and the moisture in the headlight will condense.
Below is how to get rid of water from your headlight
Remove the headlight cover from your automobile: You need to discover guidelines in your owner’s handbook on how to do this, and it is typically simple, requiring only a screwdriver to unscrew the screws maintaining the cover in location.
Remove any dirt or debris from the headlight vent that may possibly be obstructing airflow. Most headlamp assemblies have vents to stop condensation from forming in the headlamp, despite the fact that this opening may possibly turn into clogged with time.
Remove the headlight assembly as effectively as the bulbs, plugs, and any other electrical elements from the headlamp housing if there is standing water in the headlight.
With a blow dryer (the kind you use on your hair), heat the air in the headlight housing to evaporate and dry up the water.
Use clear silicone caulk to seal any spots that require it to maintain water and moisture out of the headlamp. Before reassembling the headlamp, make sure the silicone has fully dried and set.
Headlights are 1 of your car’s unsung heroes, lighting gloomy highways at evening or lighting a path on rainy days. Unfortunately, the climate can occasionally get the far better of you, and you discover oneself obtaining moisture and water in your headlights! Moisture and water in headlights will not go away on their personal, but the talked about guidelines will support you get rid of it.